
|
It is currently Fri Sep 20, 2024 5:07 pm |
|
All times are UTC - 8 hours |
 |
|
|
Page 1 of 4 |
[ 52 posts ] | Go to page 1, 2, 3, 4 Next |
| Print view | Previous topic | Next topic |
Powder Coating Quick and Easy
| Author | Message |
|---|---|
|
Site Supporter  Location: Skagit County, in the woods Joined: Tue Apr 7, 2015 Posts: 1059 |
I promised in a couple other threads that I'd post my powder coating process, so here goes. This is a copy of my posts on a couple other forums, dating back to 2013. I've changed some minor details in the years since, and will try to include all of that here.
A couple points first: - This process works best with larger batches of bullets, at least a few hundred at a time. If you're trying to coat only 50-100 bullets at a time, don't expect very good coverage. - Powder choice matters a lot. Skip the Hobo Freight powders, they really don't work as well. - Container choice matters too. The white plastic yogurt or sour cream tubs always work well for me; don't substitute other container types. I suspect these containers build up static to aid in coating. - Finally, I don't make any money off of powder coating or posting this, I'm just sharing to help out fellow casters. If you prefer a different method, that's fine with me. My method is optimized for fast, easy, and efficient coating, not for aesthetics. These are 9mm 105gr hollow point bullets from a Lee mold I modified. I shoot them at 1450 fps from my Glocks, so the coating has to be pretty tough. That doesn't mean it has to take a long time to apply though. The pics below illustrate less than 1 minute of effort on my part (other than taking the pics) for coating, and another 8-10 minutes for separating and sizing about 200 to 250 bullets. A quick note about powder BTW - not all powders are equal, in fact, none of them are equal, in my experience. Each one behaves slightly differently, even just different colors of the same brand/lineup. The powder below is RAL 6018 Yellow Green from Powder Buy The Pound About this much powder for one coat; this is roughly 200-250 bullets. Use a plastic recyclable yogurt or sour cream tub. 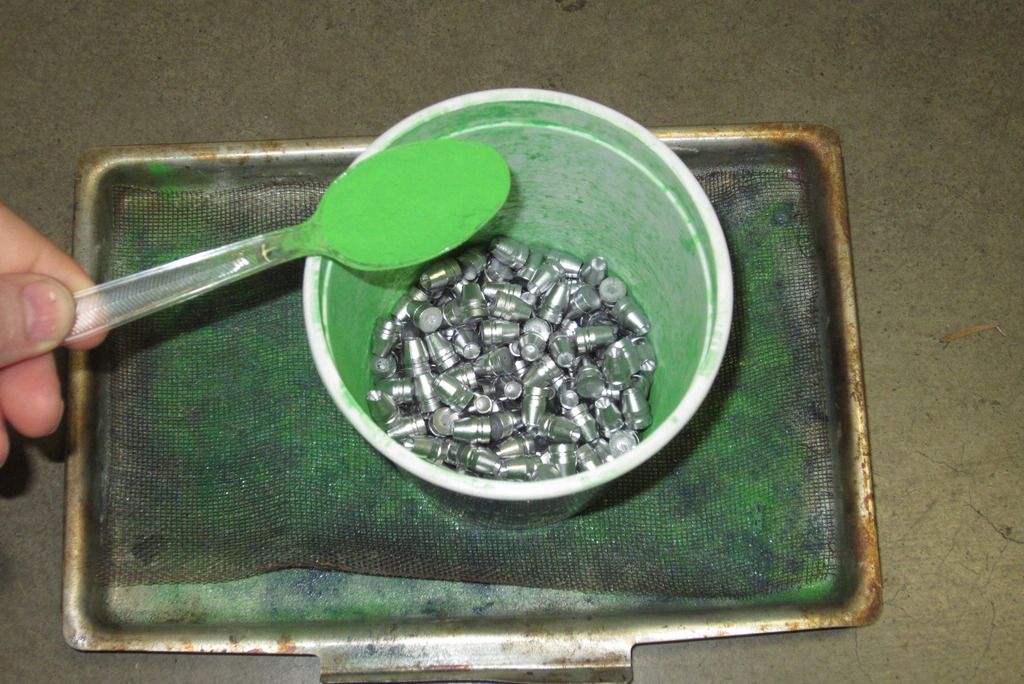 About what it should look like dumped on the bullets. If you get the quantity right, the bullets will be coated like below, with little or no extra powder left in the tub.  Edit - adding this pic for health protection, see post on page 2. Put the bullet container in a gallon ziploc bag before shaking to contain powder that escapes, you want to avoid inhaling the dust. 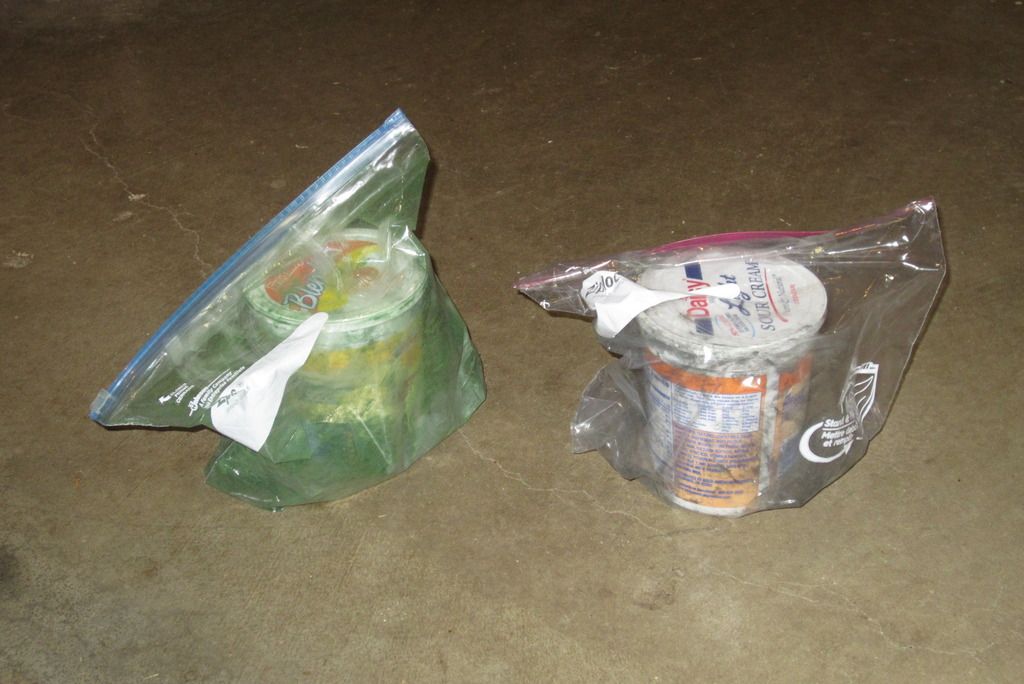 15-20 seconds of shaking by hand, hard. I do mean shake it hard; build up some static in there by swirling the bullets around, and get that powder floating around in the air. If you're holding the tub in one hand, you aren't shaking hard enough. You should feel like you got a little exercise from shaking the container of bullets. 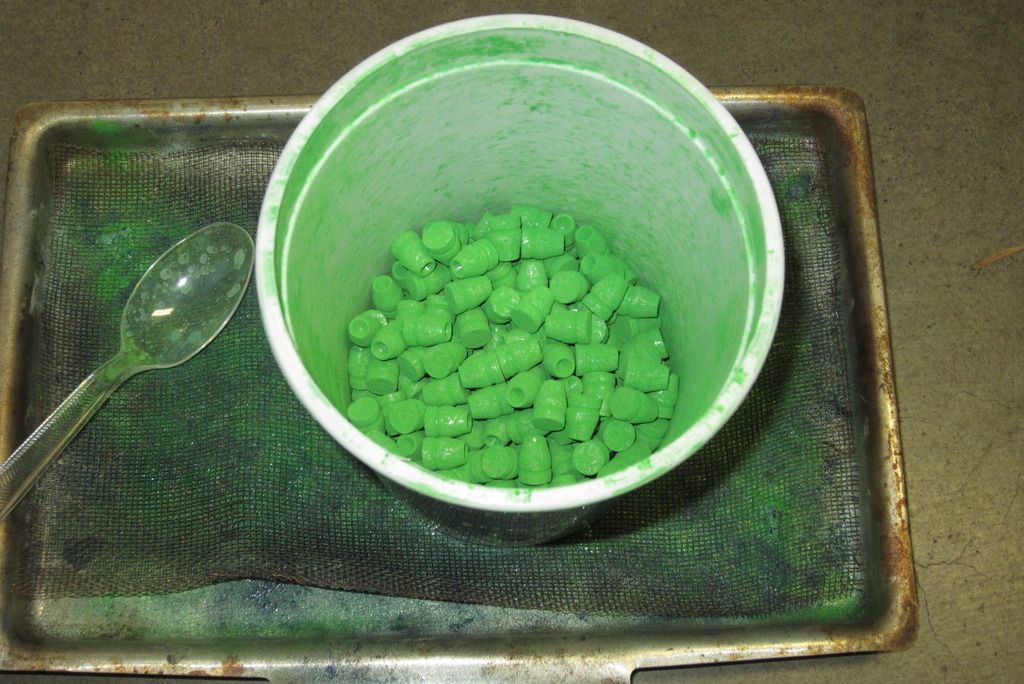 Dump them out on a tray, doesn't matter if they touch each other. I use a metal screen in the tray to avoid flat spots. Note - the amount of bullets shown here is kind of a minimum for good results; I'll normally coat 3-4x more at once, they'll be piled several layers deep on the pan. Do not touch them with your fingers!  20 minutes bake time in the toaster oven at 400* F (temp varies for different powders). You MUST use a thermometer to verify oven temp. Do this in the garage, not the kitchen, unless you're planning to get divorced soon. 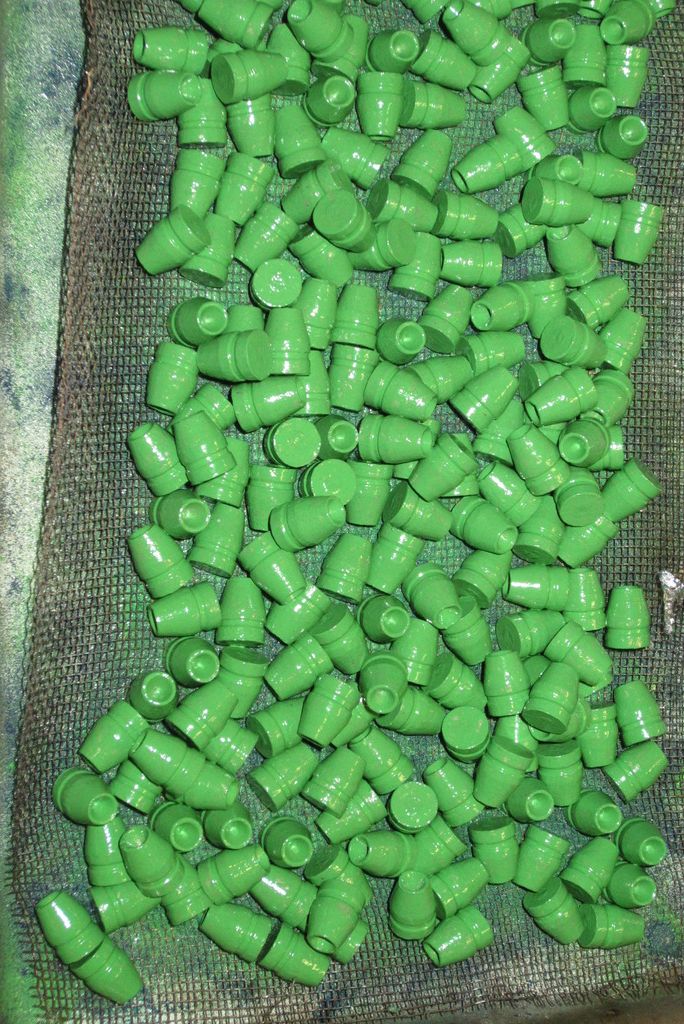 Separated, ready to size (use a push-through Lee sizer die). Notice the thin or bare spots, and marks from the screen and touching other bullets - those don't matter. These bullets pictured are every bit as accurate as any jacketed bullet in my Glocks, and will chew out the X ring at 10 yards. These have only one powder coat and are adequate for most pistol loads; you can do a second coat before sizing if you want better coverage. I don't recommend more than 2 coats. 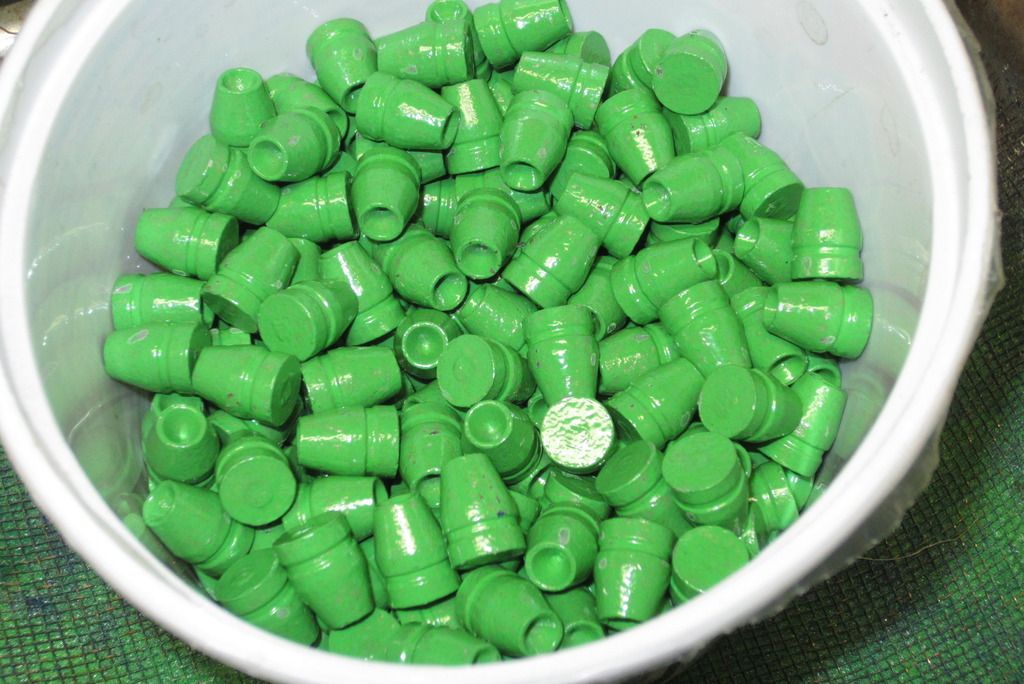 Last edited by Yondering on Wed Apr 26, 2017 10:03 pm, edited 2 times in total. |
| Mon Apr 24, 2017 9:29 pm |
|
|
Site Supporter Location: Skagit County, in the woods Joined: Tue Apr 7, 2015 Posts: 1059 |
More points to add:
There is a surprising variation in different powder coatings, in coverage, slickness, and toughness. My best results are all with TGIC Polyester coatings from "Powder Buy The Pound" (spelled buy, not by) in the RAL colors. I'm using a Bottle Green now that also works great. Breaking apart the cake of baked/coated bullets can be tedious. I get most of it broken apart by dropping the tray repeatedly on my concrete shop floor. Bullets do go everywhere, but it saves breaking apart by hand. There are always some clumps that still have to be broken apart though. When I find a couple bullets glued base to base, I just throw them back in the casting pot, it's not worth trying to separate them. Here are some more examples of my coated bullets: 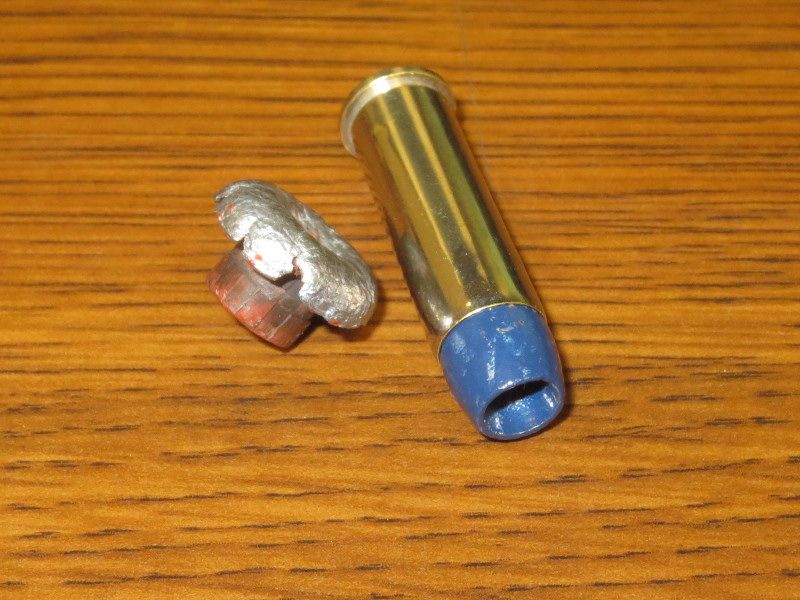  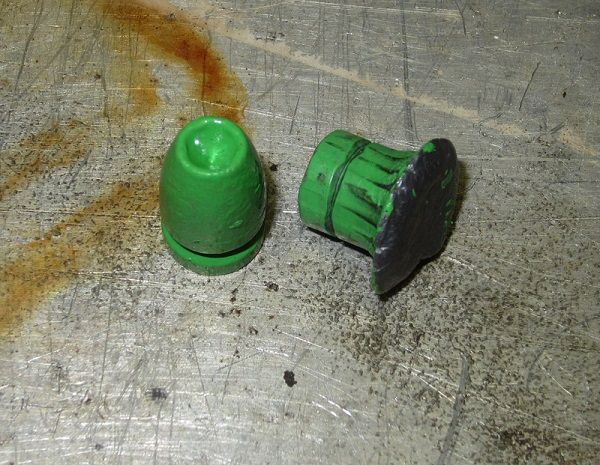 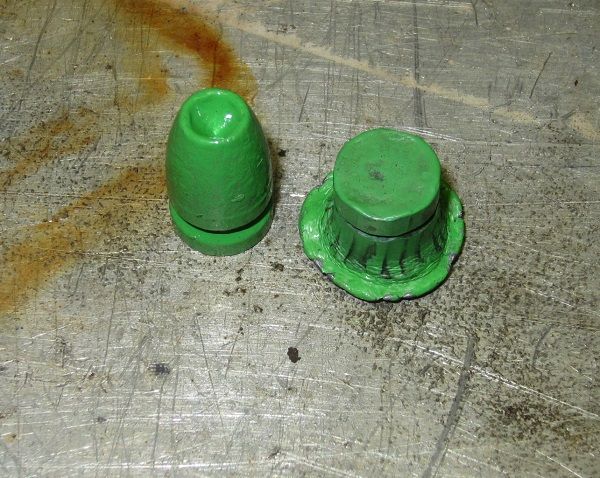 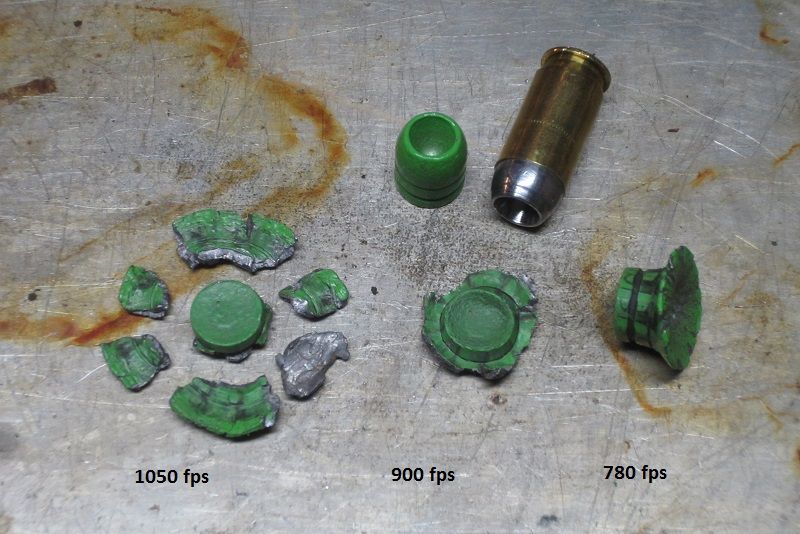 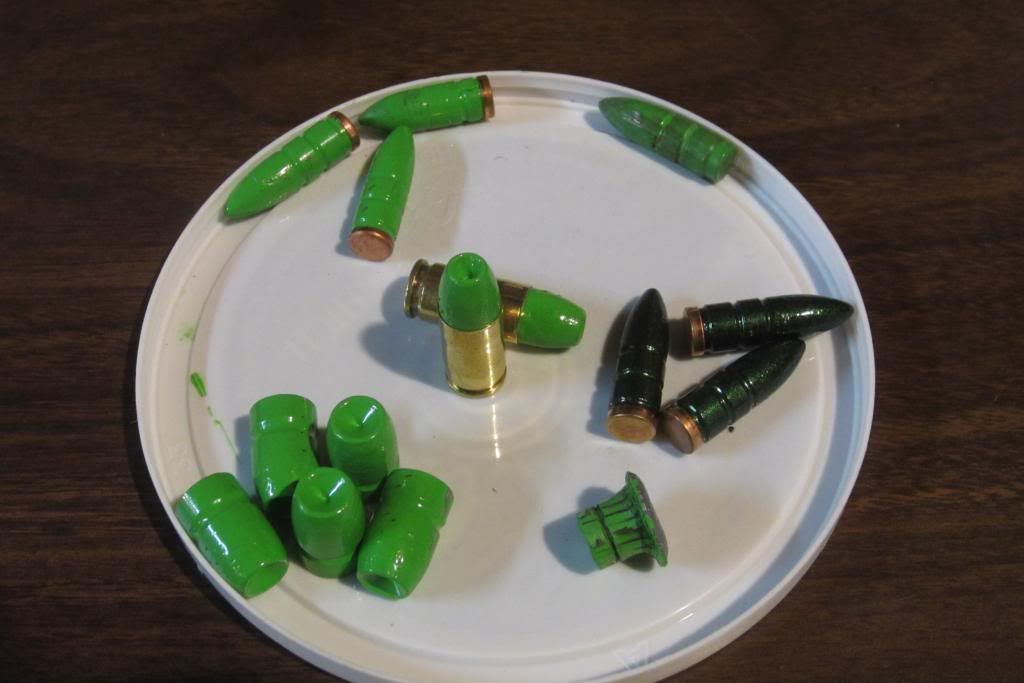 |
| Mon Apr 24, 2017 9:37 pm |
|
|
Site Supporter Location: Skagit County, in the woods Joined: Tue Apr 7, 2015 Posts: 1059 |
If you can recover any of your fired bullets, examine them! The condition of the bases and bearing surfaces can tell you a lot about how your coating is holding up.
A few handy pictures of some of mine, not all were successful: 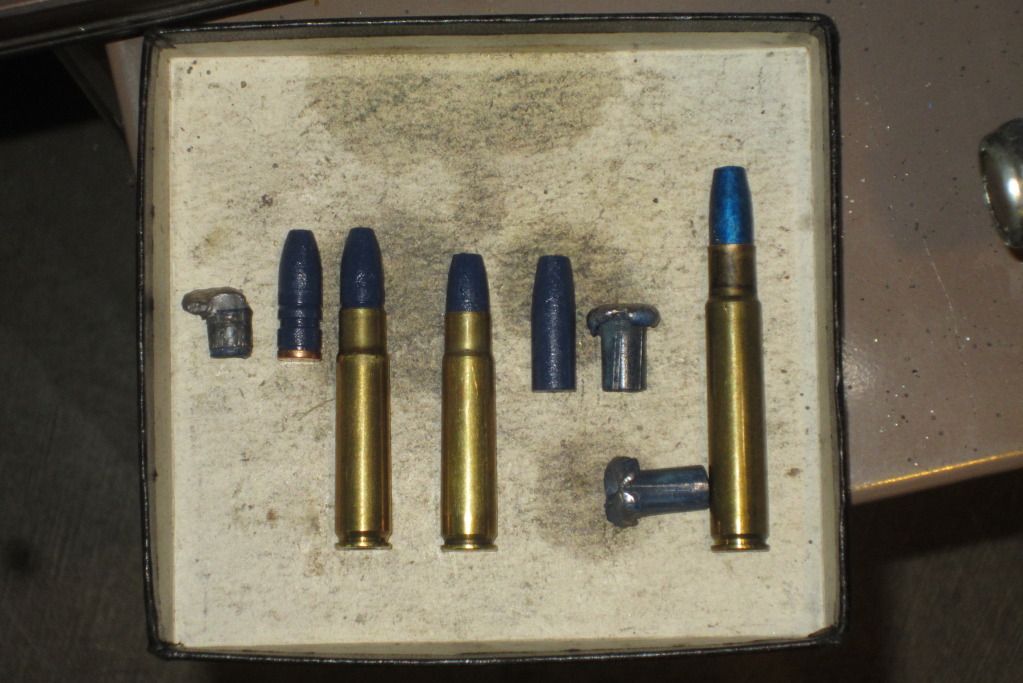 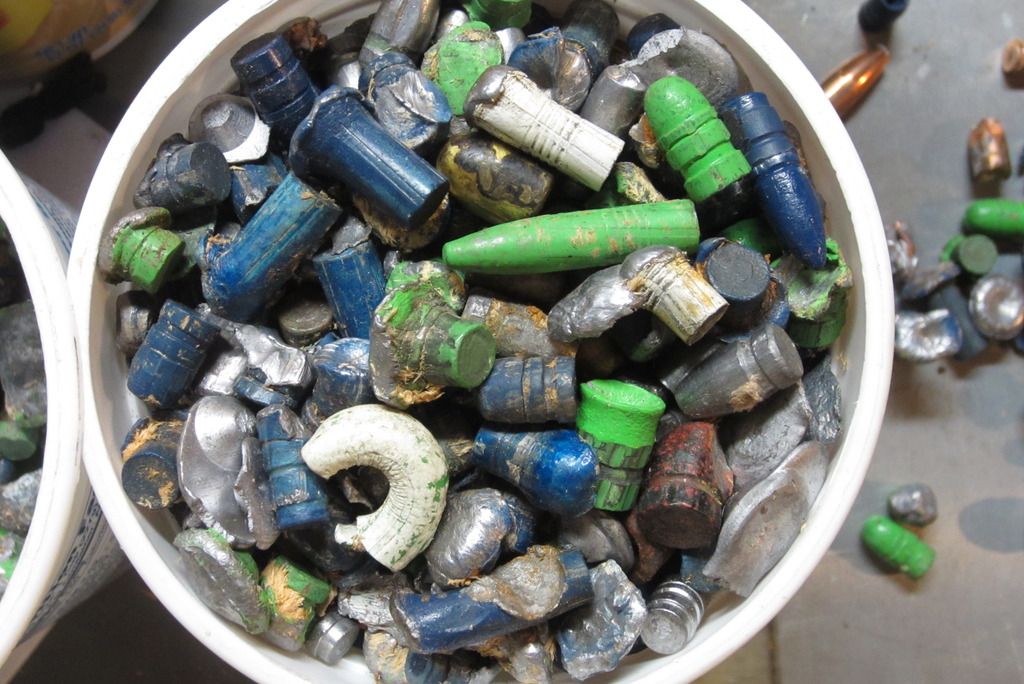 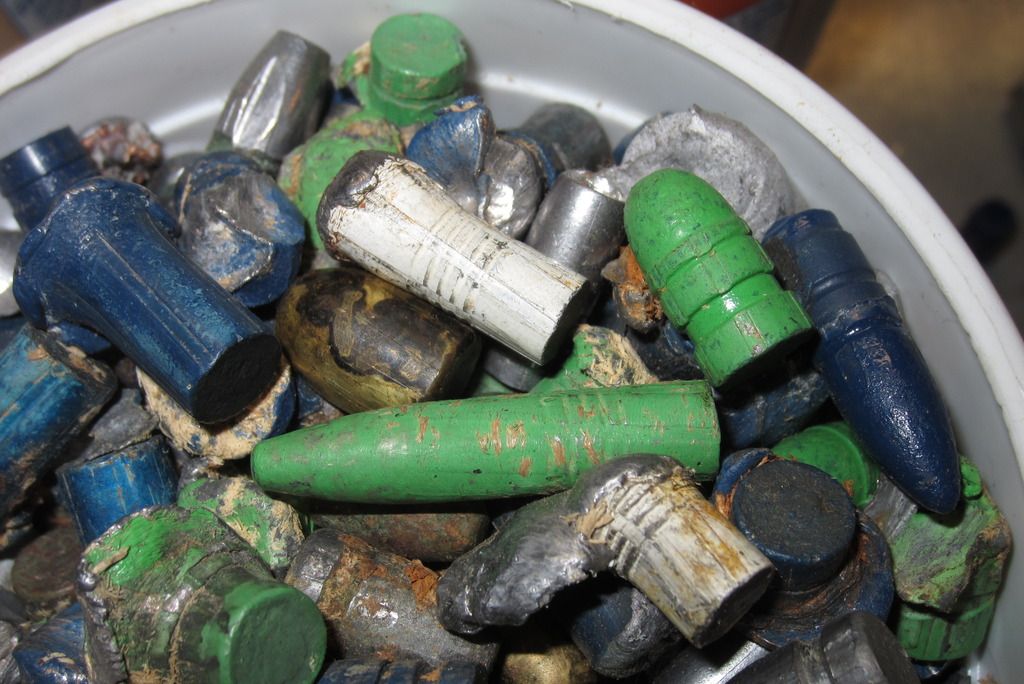 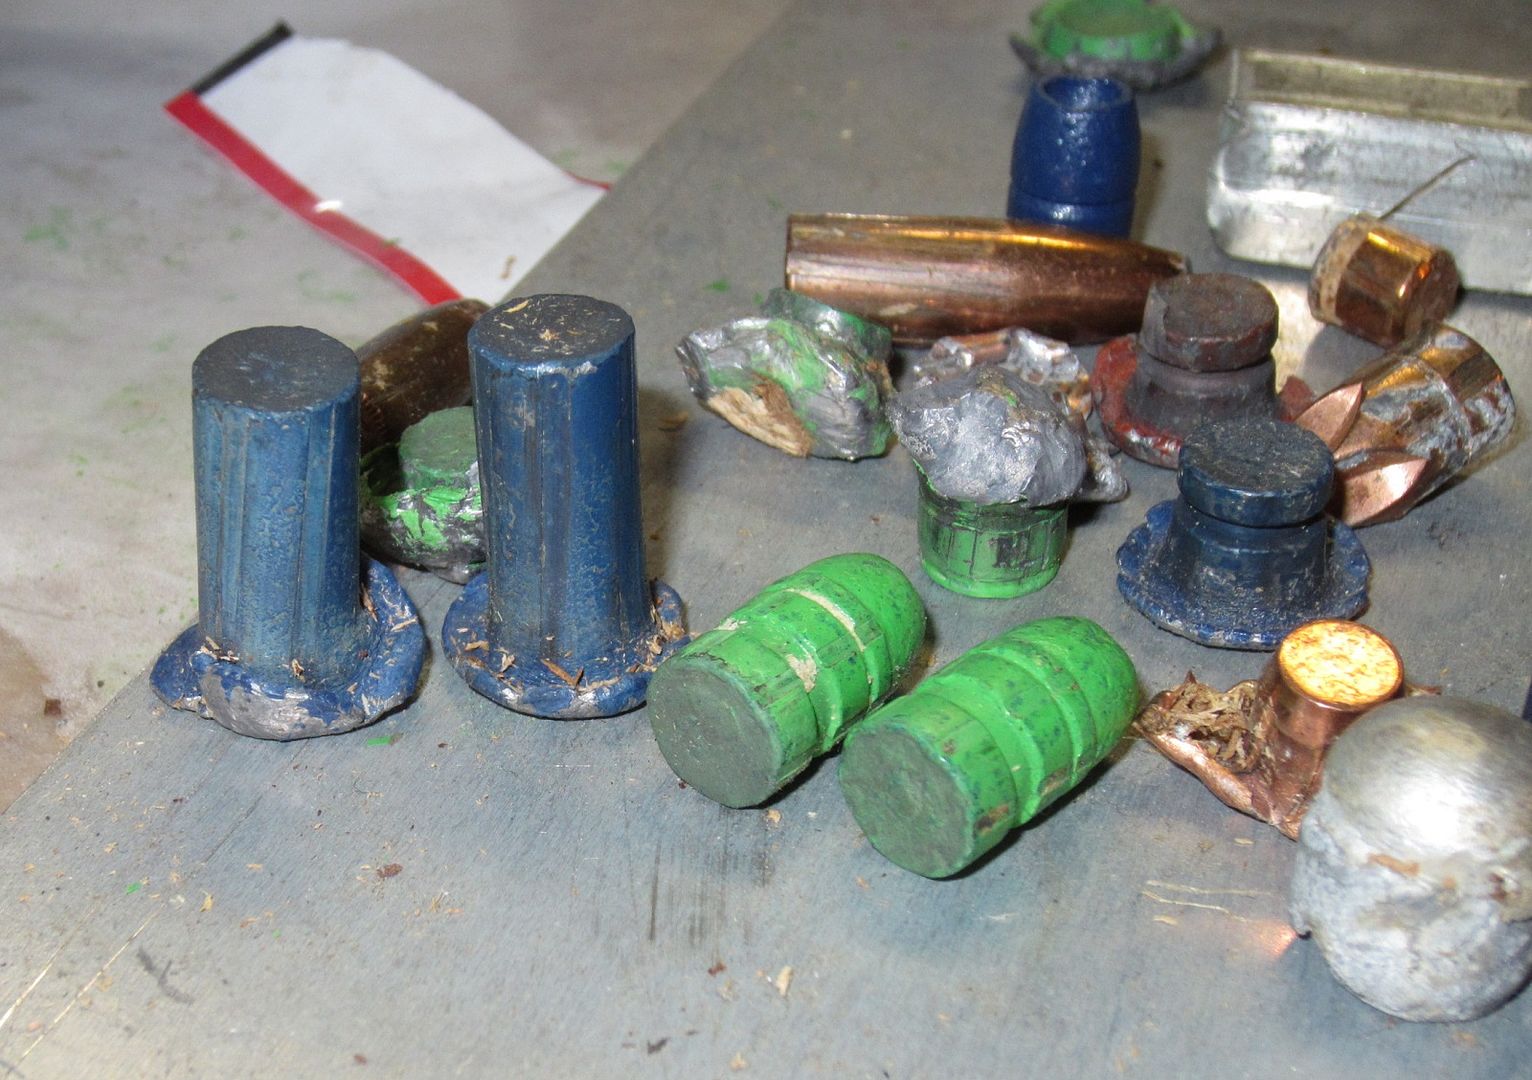 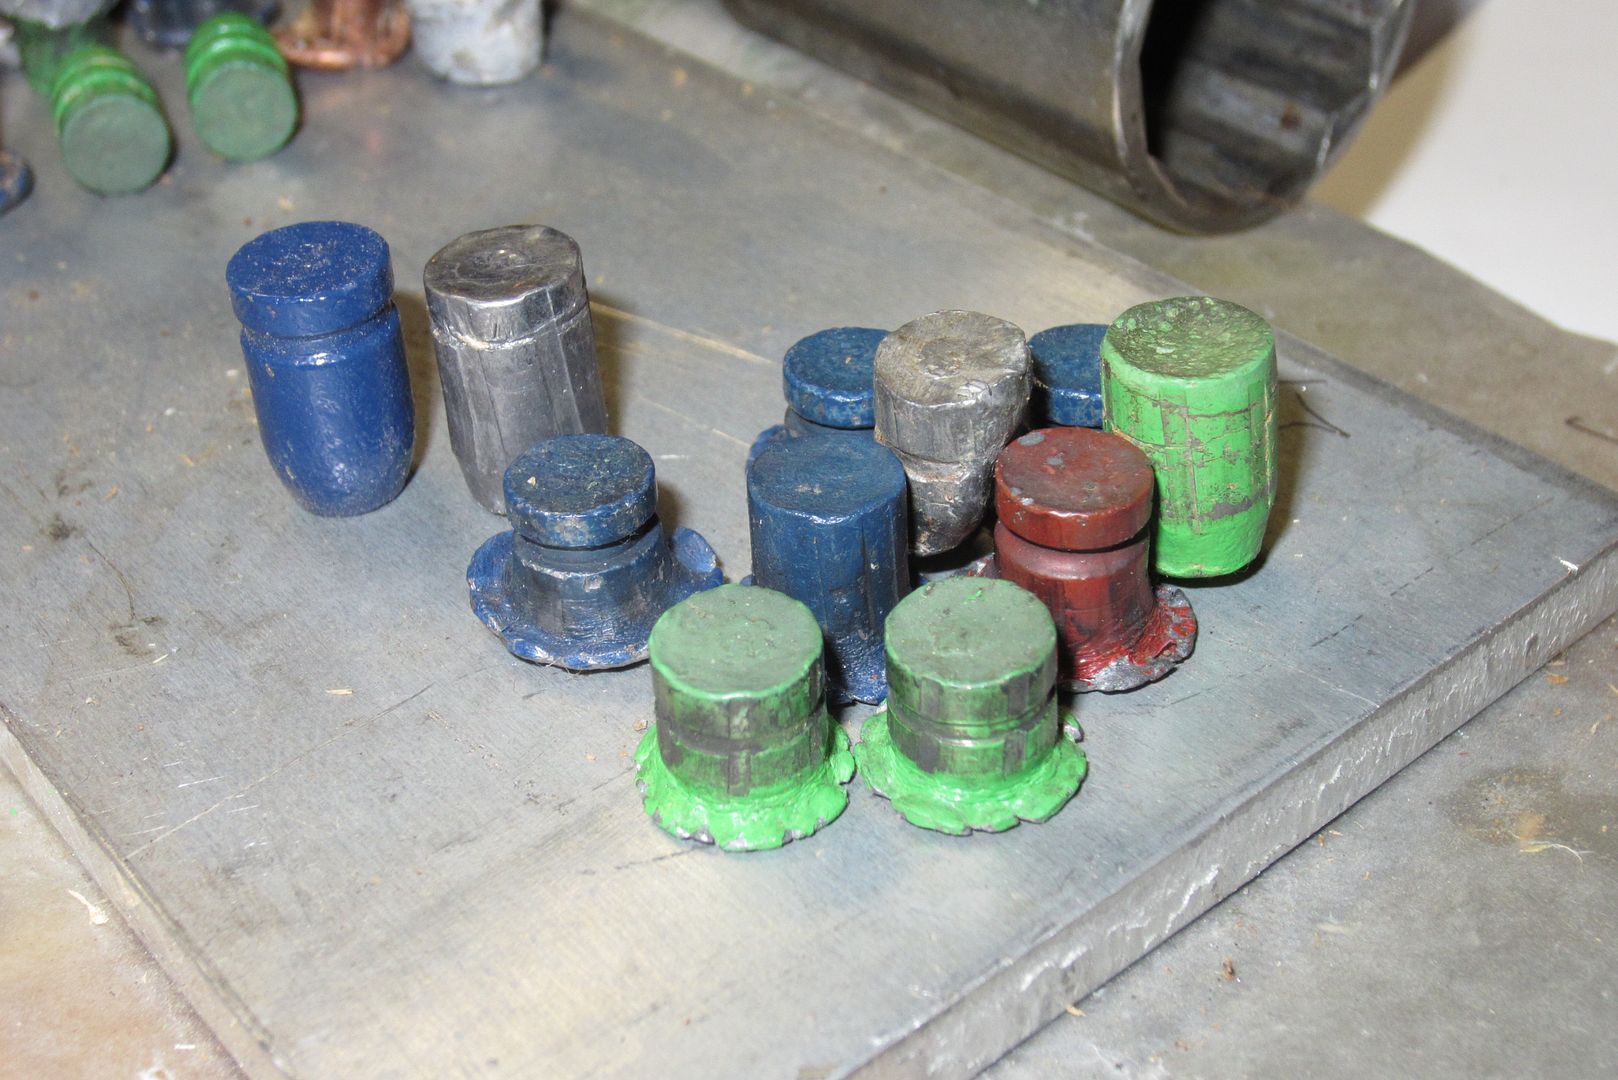 |
| Mon Apr 24, 2017 9:41 pm |
|
|
In Memoriam Joined: Wed Mar 6, 2013 Posts: 12018 |
Nicely done sir! I took some pains to bake my projectiles with some separation... Looks like it is worth the higher production to toss em in.
How many grains is that 300 BO? |
| Mon Apr 24, 2017 9:45 pm |
|
|
Site Supporter Location: Skagit County, in the woods Joined: Tue Apr 7, 2015 Posts: 1059 |
The green 300 Blk bullet with wood fibers stuck to it is ~240gr depending on alloy. It's the Lee 309-230-5R bullet with the boat tail reamed out.
As you may have noticed - no need for lube grooves with powder coating. I ream or bore them out of a lot of my molds; they cast easier and grip the bore better. That Lee bullet still has the lube grooves, I just haven't got around to boring it out the rest of the way. |
| Mon Apr 24, 2017 9:57 pm |
|
|
In Memoriam Joined: Wed Mar 6, 2013 Posts: 12018 |
Excellent information sir. You have answered a lot of my questions and I feel aimed in the right direction now.
 Thank you kindly. |
| Mon Apr 24, 2017 10:00 pm |
|
|
Site Supporter Location: Skagit County, in the woods Joined: Tue Apr 7, 2015 Posts: 1059 |
Glad to help. I'm sure there's a lot I didn't cover, feel free to ask when you get stuck.
Just thought of one more point - bullet sizing. Powder coated bullets should be sized after coating, not before. (There is no reason to size both before and after.) Variations in coating thickness and the occasional sharp edge where bullets stuck together needs to be sized down. I prefer my bullets to cast a little over final diameter, then combined with the coating I'm sizing down at least a couple thousandths. The fastest sizing method for coated bullets is the Lee push through dies. They work really well, with one caveat - every last one of them needs to be polished inside; Lee makes them look good on the outside but leaves the tapered portion inside pretty rough. I polish with emery cloth on a split steel 1/4" dowel chucked in a cordless drill. Generally I buy the sizing die a thousandths or two smaller than my desired final diameter, so it'll end up at the right size after polishing. For 9mm for example, I use a .356" die polished out to .3575". With these dies, I typically can size ~250 bullets in 10 minutes. I do this while waiting for the next batch of bullets in the oven. If I coat in 500 bullet batches, I can coat and size 1,000 bullets in about 1 hour. A possible improvement on the sizing process could be to use a powered bullet feeder mounted on the press. I haven't done this though. |
| Mon Apr 24, 2017 10:31 pm |
|
|
Site Supporter Location: Free At last in NC! Joined: Wed Nov 28, 2012 Posts: 719 |
Interesting. What problem does powder coating solve?
|
| Tue Apr 25, 2017 7:43 am |
|
|
In Memoriam Joined: Wed Mar 6, 2013 Posts: 12018 |
rodell wrote: Interesting. What problem does powder coating solve? From a low-experience viewpoint: Lube not required Reduced leading Partial effect of a gas check (Maybe?) Cleaner, no black fingers from oxidized lead I like the idea of separating test loads by color... Powder coat a couple of 100 of several colors, do a ladder test with different color pills for each charge. Outshoot your buddy with pink pills. I am reaching now. I can feel a whole bunch of BS reasons just itching for a telling. |
| Tue Apr 25, 2017 7:48 am |
|
|
In Memoriam Joined: Wed Mar 6, 2013 Posts: 12018 |
Another :
I plan on making lead alloys for different applications, so powder coating different hardnesses of the projectiles would let me pick a color for certain velocities. For the testing, the different alloys will keep some of their coating for examination. After the experiments are done, the differing alloys are identifiable without labels. |
| Tue Apr 25, 2017 7:54 am |
|
|
Site Supporter  Location: Bellingham Canada Joined: Thu Jan 3, 2013 Posts: 4995 Real Name: Josheewa |
PMB wrote: rodell wrote: Interesting. What problem does powder coating solve? From a low-experience viewpoint: Lube not required Reduced leading Partial effect of a gas check (Maybe?) Cleaner, no black fingers from oxidized lead I like the idea of separating test loads by color... Powder coat a couple of 100 of several colors, do a ladder test with different color pills for each charge. Outshoot your buddy with pink pills. I am reaching now. I can feel a whole bunch of BS reasons just itching for a telling. good list. I have shot Bear Creek moly coated bullets for years now, and won't go back to copper jackets because moly is superior imo. Your list is a good one. _________________ It must be frustrating always being the smartest person in the room.-Jagerbomber35 Divided we fall. |
| Tue Apr 25, 2017 8:02 am |
|
|
Site Supporter Location: Skagit County, in the woods Joined: Tue Apr 7, 2015 Posts: 1059 |
rodell wrote: Interesting. What problem does powder coating solve? The big one is leading. Que the line of guys saying "I don't get leading". Sure, you can get there with very specific carefully tailored loads with lubed bullets, in some conditions. I've been there and done that for years before discovering powder coating. Powder coating makes that a lot easier, to the point that leading is just not a consideration in load development any more. This includes loads that are not possible to do accurately or without leading by conventional lube methods. The other reasons are reduced lead exposure (big one for indoor ranges) and cleaner handling, including no lube mess in the reloading dies. I've used a bunch of Bear Creek bullets too and like them. They work similarly to powder coating up to ~1600 fps in my experience, but powder coating is good to at least 3,000+ fps. I'm fine with Bear Creek bullets for handguns, but want a good powder coated bullet for fast rifle loads. |
| Tue Apr 25, 2017 5:38 pm |
|
|
Site Admin   Location: Renton, WA Joined: Sun Mar 13, 2011 Posts: 52516 Real Name: Steve |
Yondering, thank you for posting this!
The powder coating that I've done has been with Harbor Freight powder. Your commentary on that is noted. I've also used non-stick aluminum foil in my baking pan, and gone to great pains with a hemostat to get all of the bullets set up on end and separated from each other before baking. Your "pile 'em high" approach shocked me . . . and I'm excited to try it.  _________________ Steve Benefactor Life Member, National Rifle Association Life Member, Second Amendment Foundation Patriot & Life Member, Gun Owners of America Life Member, Citizens Committee for the Right to Keep and Bear Arms Legal Action Supporter, Firearms Policy Coalition Member, NAGR/NFGR Please support the organizations that support all of us. Leave it cleaner than you found it. |
| Tue Apr 25, 2017 8:50 pm |
|
|
Site Supporter Location: Skagit County, in the woods Joined: Tue Apr 7, 2015 Posts: 1059 |
The non-stick foil might work with my method too, I don't know. Wire screen works so well I haven't bothered to try anything else.
|
| Tue Apr 25, 2017 11:40 pm |
|
 Location: Union Gap Joined: Sun Mar 27, 2016 Posts: 1751 Real Name: Randall Knapp |
Yoncdering....I see that you are gaschecking. How are you getting the gascheck on over the powder coating since the powdercoating in effect makes thge bullet diameter larger. I just ran a bunch of .44 magnum and PCed them but I sized and gaschecked then powder coated and sized again. My gaschecks would barely fit my bullets cast from my Lee moldwithout the powder.
|
| Tue Apr 25, 2017 11:47 pm |
|
|
|
Page 1 of 4 |
[ 52 posts ] | Go to page 1, 2, 3, 4 Next |
|
All times are UTC - 8 hours |
Who is online |
Users browsing this forum: No registered users and 10 guests |
| You cannot post new topics in this forum You cannot reply to topics in this forum You cannot edit your posts in this forum You cannot delete your posts in this forum You cannot post attachments in this forum |